Save 23% ($351) & Get a Free 1-1 Call with our Team ⏰ : 0d 2h 59m 43s
Our previous tutorial goes through the basics of setting up and using MetaMask. This tutorial will go through some of the more advanced features.
Let’s dive in!
Adding other networks
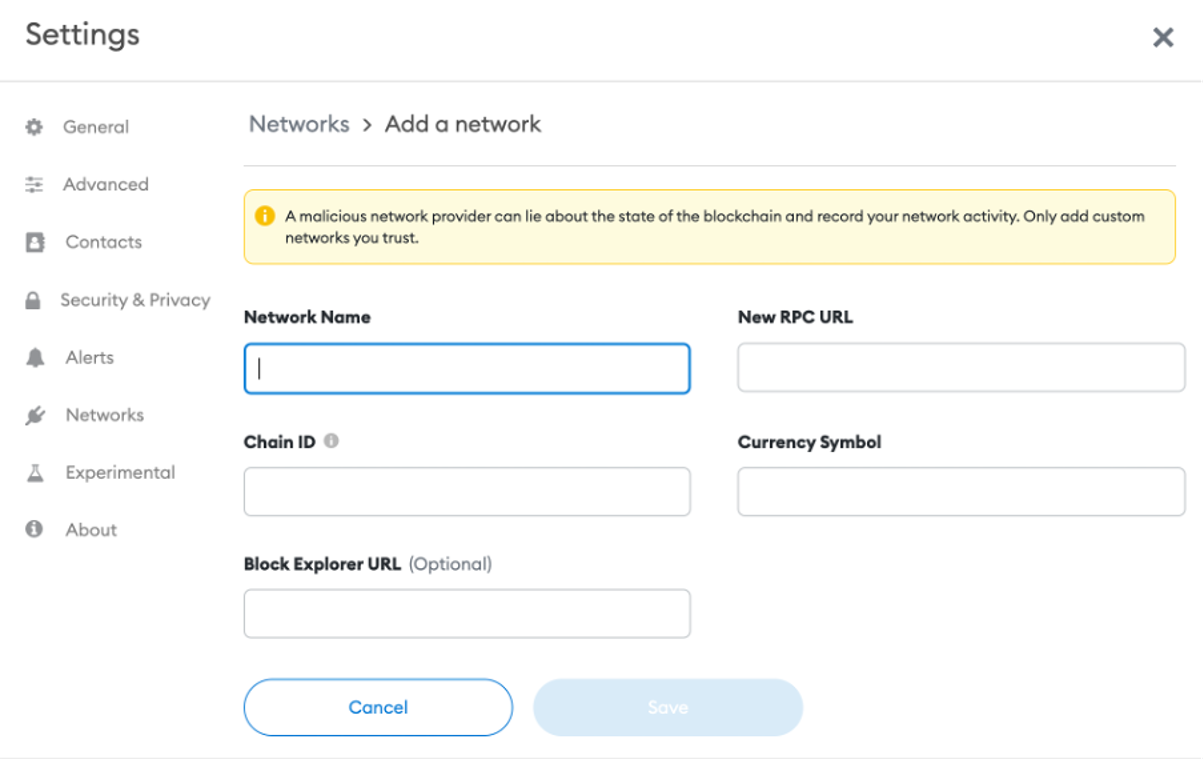
Your MetaMask wallet will be set to the Ethereum Mainnet by default; however, MetaMask supports any network that is compatible with Ethereum. To use MetaMask with these networks, you’ll first need to manually add them to your wallet.Start by clicking the Ethereum Mainnet tab followed by ‘add network’.
 On the following page, you will need to enter the necessary network details. It’s extremely important that the details you use are correct and from a reputable source (e.g. the network’s official website). You don’t want to end up adding a scam chain! Below we’ve sourced the information you need for five popular networks (Avalance, BNB, Arbitrum, Optimism and Moonbeam).
After you click ‘save’, this network should be available as an option in the network drop-down menu on your wallet’s homepage.
Avalanche
Network Name: Avalanche NetworkNew RPC URL: https://api.avax.network/ext/bc/C/rpc
ChainID: 43114
Currency Symbol: AVAX
Block Explorer: https://snowtrace.io/
BNB Chain (rebranded name from Binance Smart Chain)
Network Name: Smart ChainNew RPC URL: https://bsc-dataseed.binance.org/
Chain ID: 56
Currency Symbol: BNB
Block Explorer URL: https://bscscan.com/
Arbitrum
Network Name: ArbitrumNew RPC URL: https://arb1.arbitrum.io/rpc
Chain ID: 42161
Currency Symbol: AETH
Block Explorer URL: https://arbiscan.io
Optimism
Network name: Optimistic EthereumRPC URL: https://mainnet.optimism.io
Chain ID: 10
Currency Symbol: ETH
Block Explorer: https://optimistic.etherscan.io
Moonbeam
Network Name: MoonbeamRPC URL: https://rpc.api.moonbeam.network
Chain ID: 1284
Currency Symbol: GLMR
Block Explorer: https://moonscan.io/
Transferring assets to other networks
Although your MetaMask address remains the same across all networks, the assets in your wallet on the Ethereum Mainnet do not directly transfer over to these networks.The process of transferring tokens to other networks will vary slightly depending on the chain you are using. However, generally speaking, this involves the use of a bridging service (e.g. Arbitrum Bridge, Polygon Bridge , Optimism Bridge , Avalanche Bridge ).
The bridging process is pretty straightforward but let’s go through a quick example using Arbitrum.
First, head to the bridging website (in this case, https://bridge.arbitrum.io). When you visit this page, you should be prompted to unlock and connect your MetaMask wallet.
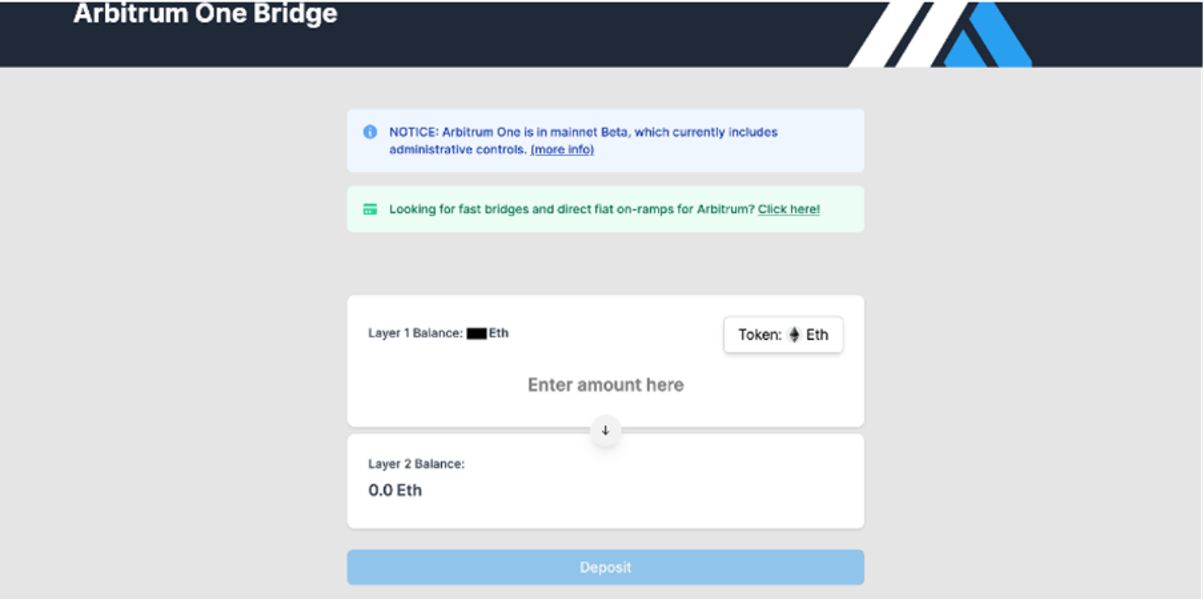
Next, you will need to select the type and enter the amount of the token you want to send. Once you click ‘deposit’, it should take no more than 15 minutes for the funds to arrive into your MetaMask account on the Arbitrum network. Note that this process will require you to pay Layer 1 Ethereum gas fees.
Adding custom token support
Sometimes the token support for smaller or less common assets does not appear automatically when you deposit them into your account. If this happens, don’t worry! All you need to do is add the support for this token/coin manually.Start by clicking on ‘import tokens’ towards the bottom of your wallet’s main page.
Next, select the ‘custom token’ tab. On the following page, you’ll have to enter the required details for your token.

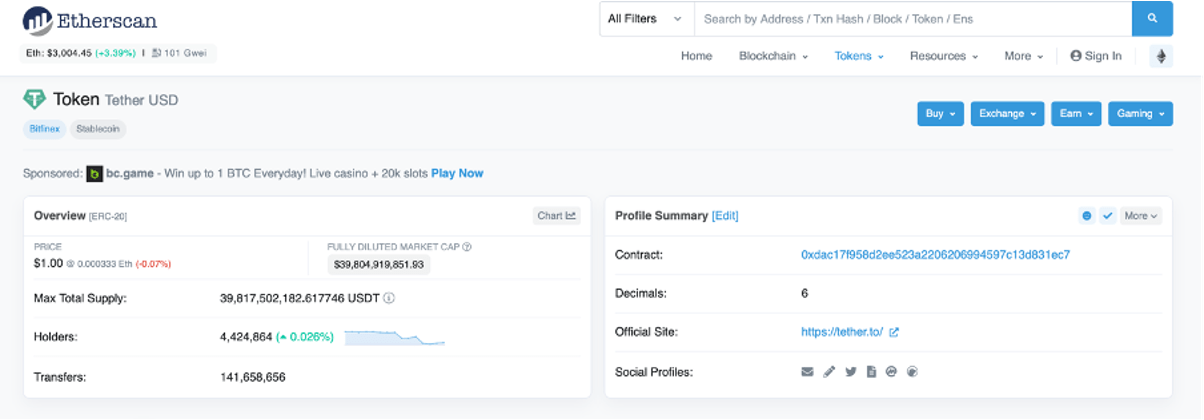
This information can be found on the token’s official website or by searching the token on https://etherscan.io/tokens. Unfortunately, there are a lot of scams out there, so it’s really important that you obtain this information from a reputable source. It’s also a good idea to cross-check this information. Here’s an example:
Once you enter in these details and click ‘add custom token’, the support for this token should now be visible in the ‘assets’ tab on your wallet’s main page.
Using advanced gas control
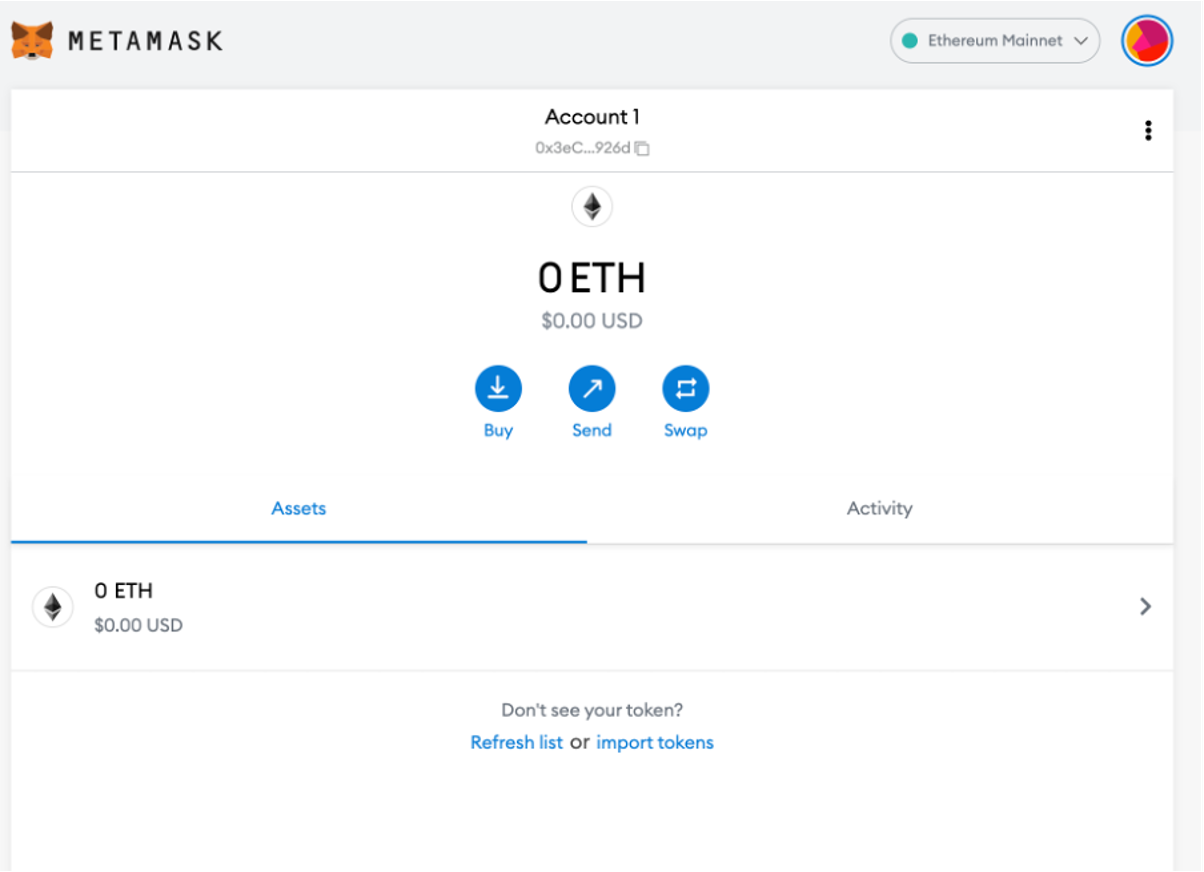
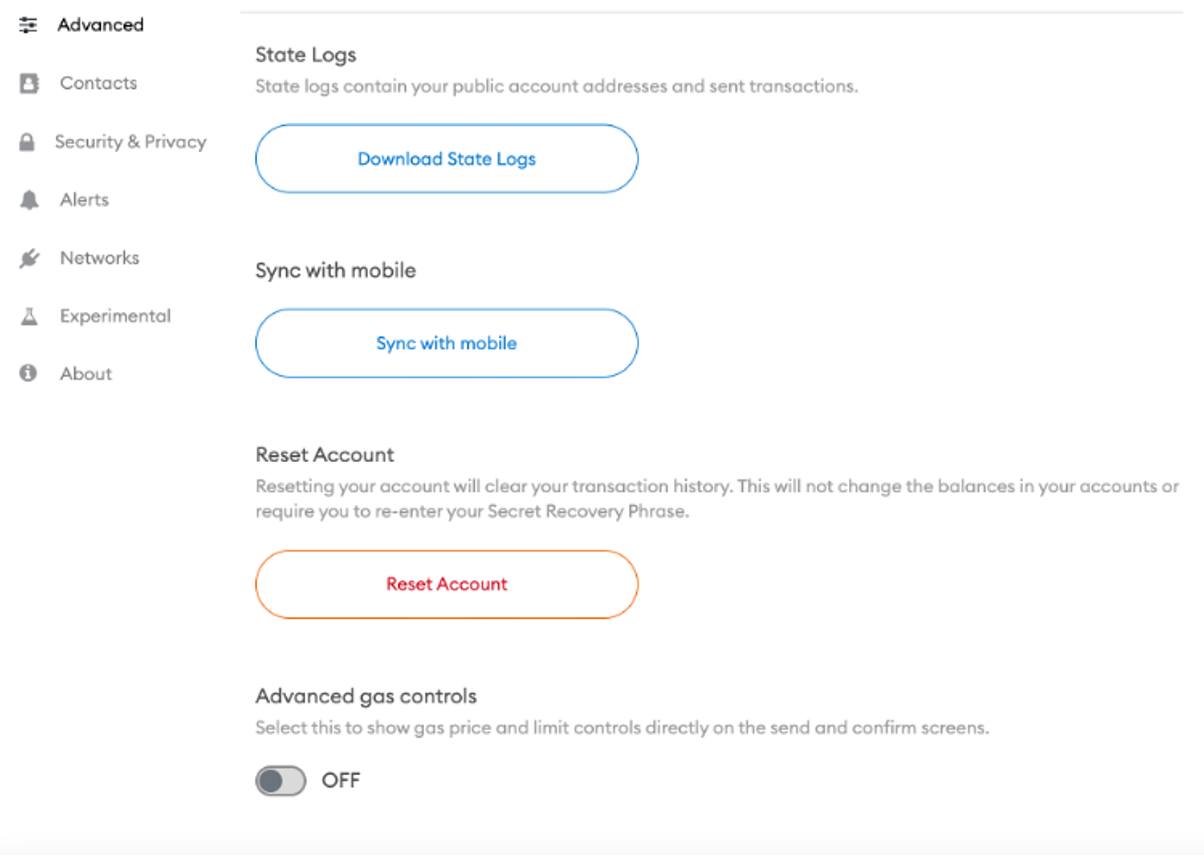
This tutorial assumes that you have a basic understanding of what gas fees are. Click here for our guide on Ethereum gas fees if you're unsure.MetaMask gives you the option to enable advanced gas controls, which will allow you to have more control over the gas fees you pay. To do this, click on your account icon followed by ‘settings’.

Next, click on the ‘advanced’ settings tab and scroll down until you reach ‘advanced gas controls’. Click the toggle switch to enable this feature.
Now the next time you are carrying out a transaction, you’ll have the option to ‘edit’ your gas fee.
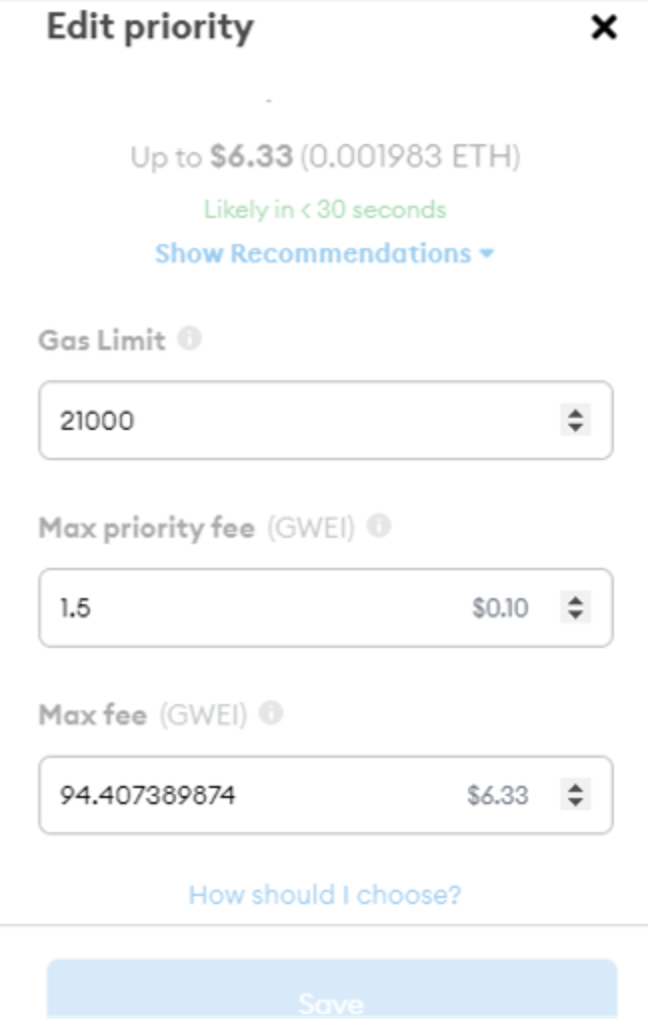
Here you’ll be able to specify the gas limit (the max amount you are willing to spend on gas), max priority fee (this is a fee that goes to the miner/ validator to incentivise them to prioritise your transaction) and the max fee ( this is the base fee + priority fee) that you want to pay. Generally, the more you’re willing to pay, the quicker you can expect your transaction to be processed.
Altering a pending transaction
Sometimes transactions submitted with a low gas price can take quite a while to process. It can also be the case that transactions submitted with a relatively high gas price are stuck in the ‘pending’ phase for longer than expected.Regardless of which situation you’re in, you can do a couple of different things to resolve it.
Before you go ahead with one of the steps below, first try closing and reopening the app/ browser extension.
Speed up a transaction
Select the ‘activity’ tab on your wallet’s home screen; here, you’ll be able to see any pending transactions.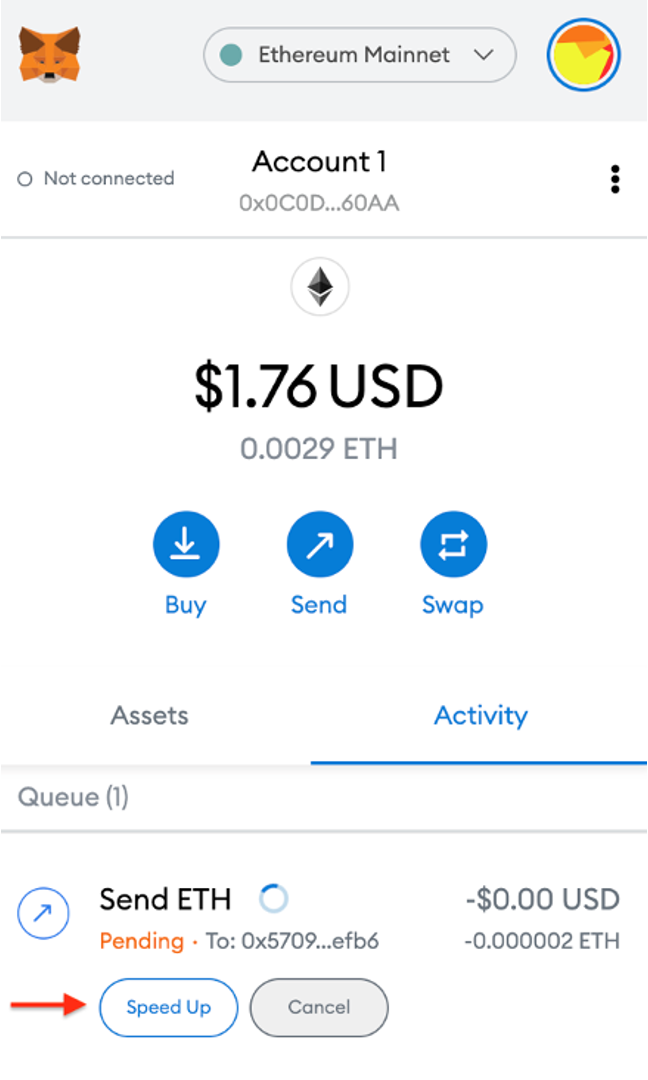
Some people use gas trackers such as Etherscan's or ETH Gas Station for guidance on what fees to submit.
Another handy tool is this Ethereum heatmap, which some people use to try to submit transactions during lower fee times (i.e. when the network is quieter).
Cancelling a transaction
To cancel a transaction, all you need to do is click the ‘cancel’ button on the same screen as above. Note that this option will only be available for transactions that are still pending on the network.Connecting a hardware wallet
It’s possible to connect a cold wallet device (Ledger or Trezor) to your MetaMask. We have a full tutorial on setting up and using a Ledger Hardware wallet. For this tutorial, we’ll just run through how to connect Ledger to MetaMask.First, you will need to make sure that you have the latest version of firmware and the Ethereum app installed on your Ledger device and Ledger Live app (this is explained more in our Ledger tutorial). Also, plug in your device to your laptop via USB and make sure it is unlocked.
Next, click on your MetaMask account icon followed by ‘settings’. In the ‘advanced’ settings tab, scroll down to the ‘preferred Ledger connection type’ section and select ‘Ledger Live’.

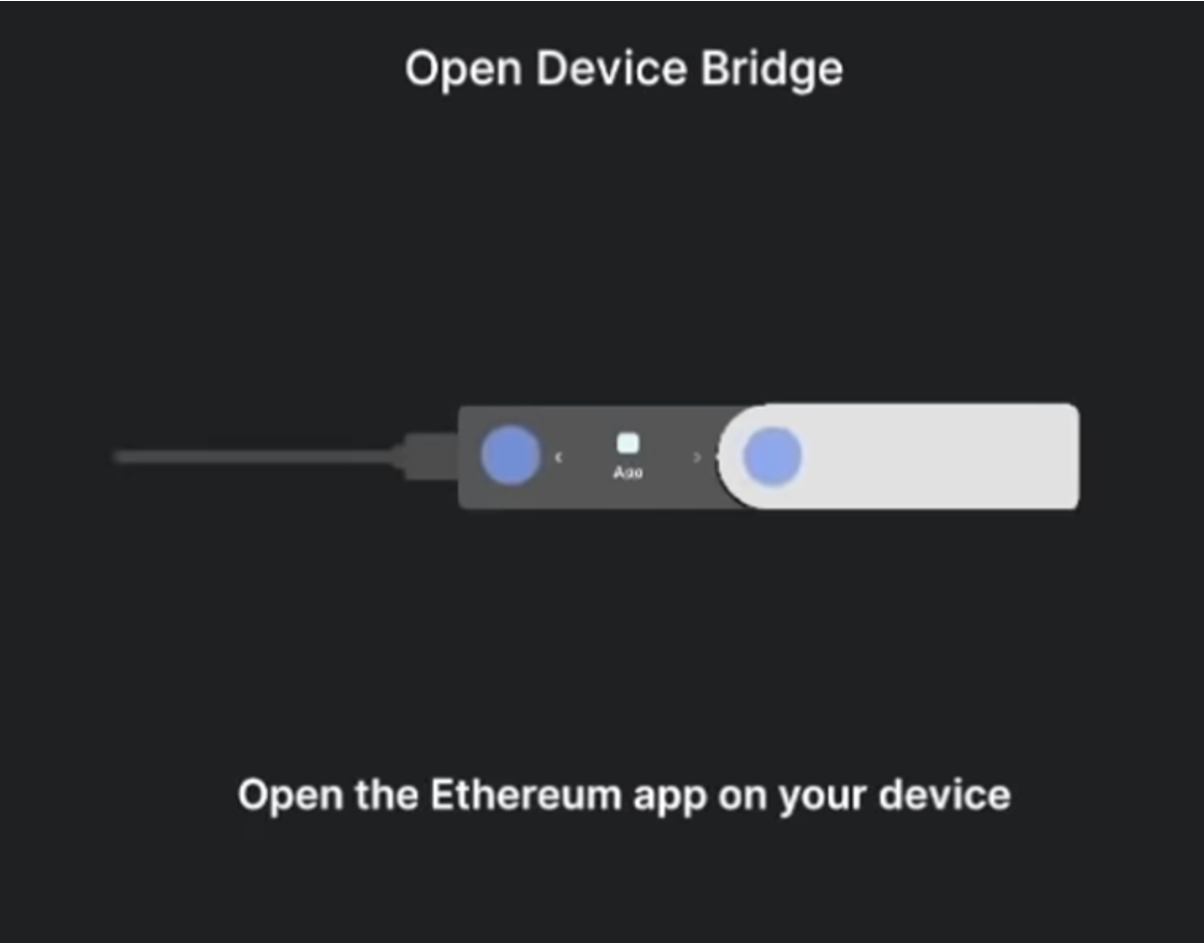
Click on your profile icon again, and this time select ‘connect hardware wallet’. On the following screen, select the Ledger icon and press ‘continue’. This will open a link that takes you back to your Ledger Live app. Click ‘open’. You will then be prompted to open the Ethereum app on your device.
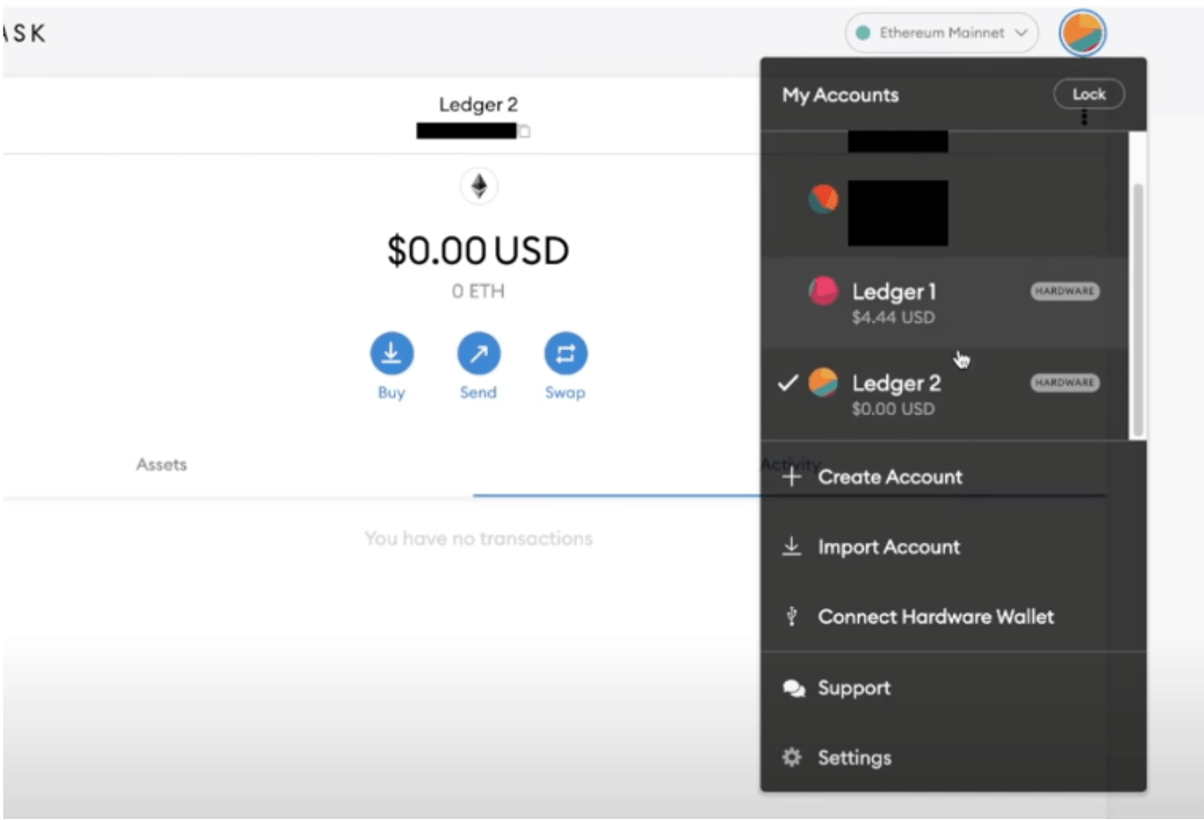
Once you have this done, navigate back to your MetaMask wallet. A screen should appear where you will be able to add one or several Ledger Ethereum accounts to your MetaMask wallet.

Click ‘unlock’. When you click on your MetaMask profile icon, you will be able to see your Ledger accounts that you added.
Importing accounts
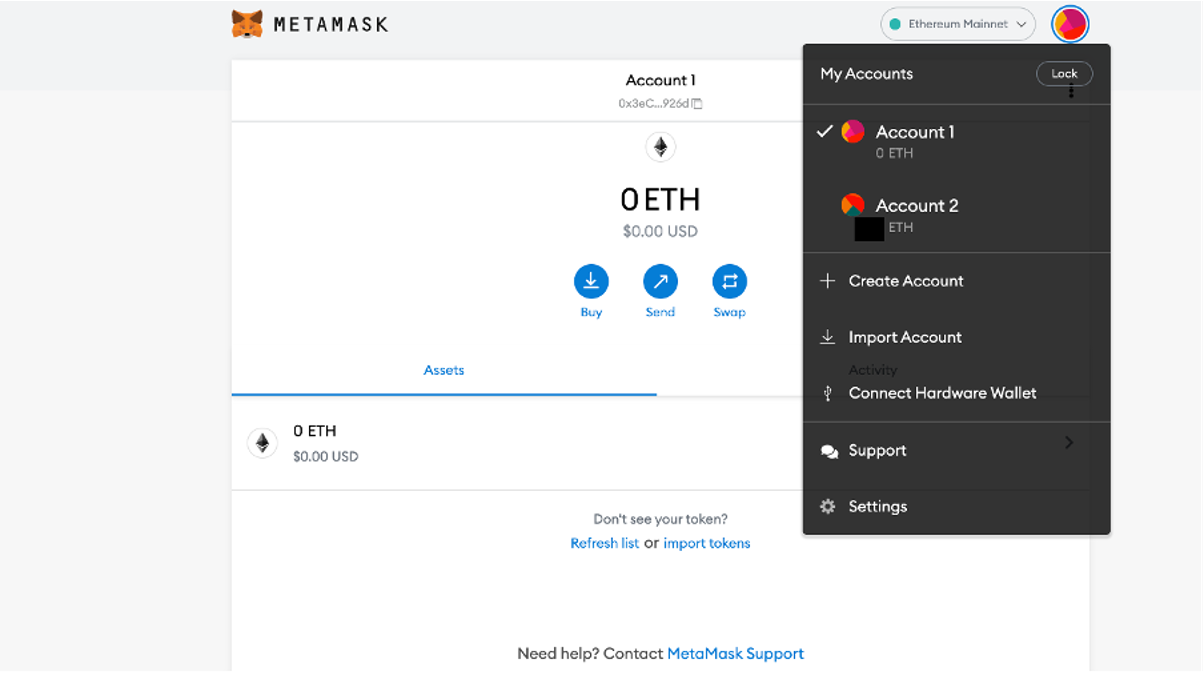
To import an account (e.g. from another wallet) into your MetaMask, click your profile icon followed by ‘import account’. Also, make sure your MetaMask is set to the same network of the account you are importing.
On the following screen, simply enter the private key of the account you want to import and click ‘import’.
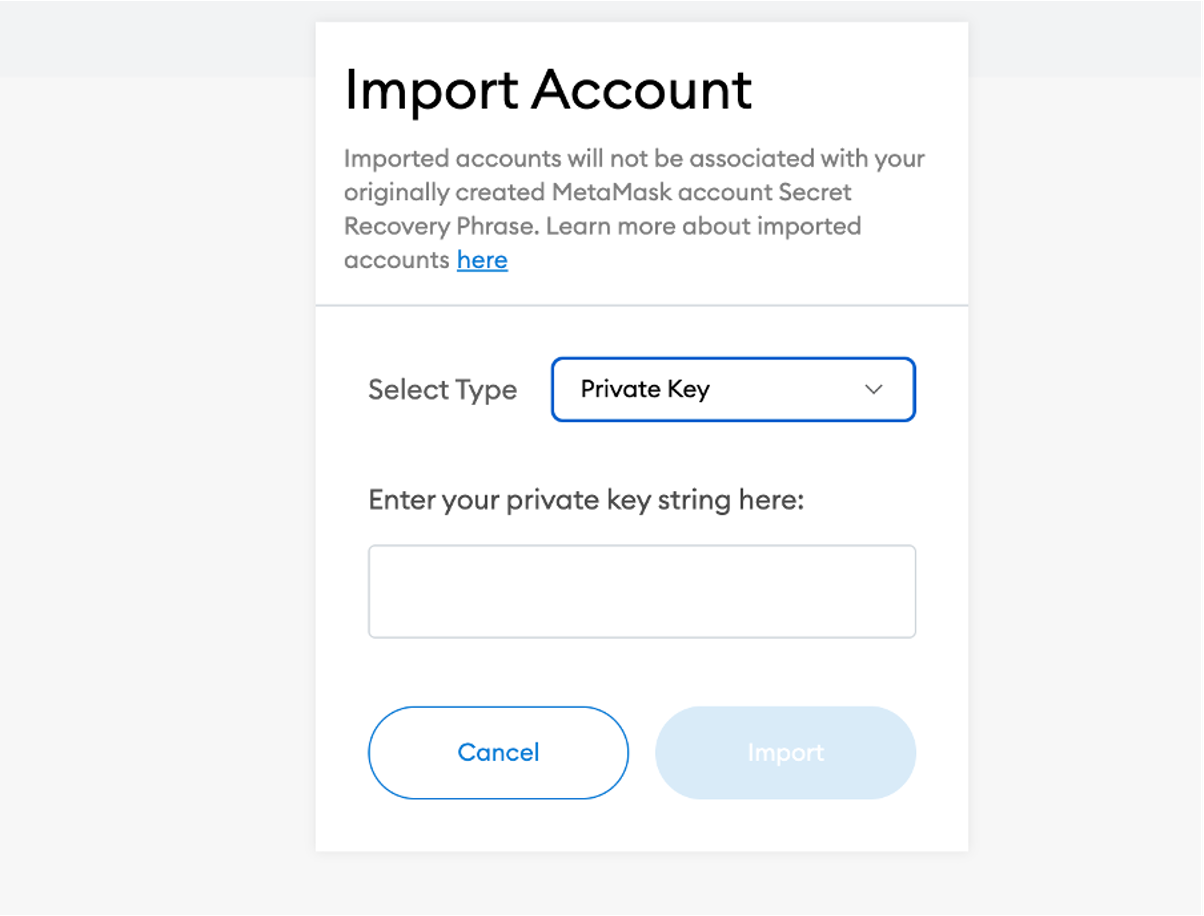
An important point to note: accounts that are imported are not backed up by your MetaMask recovery phrase, meaning that you will still need to store the private keys of these accounts in a safe place.
Disclaimer: THIS IS NOT FINANCIAL OR INVESTMENT ADVICE. Only you are responsible for any capital-related decisions you make, and only you are accountable for the results.
Comment and share if you found this tutorial useful! Also, keep an eye out for more advanced tutorials coming soon.
Continue reading by joining Cryptonary Pro
$1,548 $1,197/year
Get everything you need to actively manage your portfolio and stay ahead. Ideal for investors seeking regular guidance and access to tools that help make informed decisions.
For your security, all orders are processed on a secured server.
As a Cryptonary Pro subscriber, you also get:
3X Value Guarantee - If cumulative documented upside does not reach 300% during your 12-month membership, you can request a full refund. Terms
24/7 access to experts with 50+ years’ experience
All of our top token picks for 2025
On hand technical analysis on any token of your choice
Weekly livestreams & ask us anything with the team
Daily insights on Macro, Mechanics, and On-chain
Curated list of top upcoming airdrops (free money)
3X Value Guarantee
If cumulative documented upside does not reach 300% during your 12-month membership, you can request a full refund.
Our track record speaks for itself
With over 2.4M tokens and widespread misinformation in crypto, we cut through the noise and consistently find winning assets.
Our track record speaks for itself
With over 2.4M tokens and widespread misinformation in crypto, we cut
through the noise and consistently find winning assets.


Frequently Asked Questions
Can I trust Cryptonary's calls?
Yes. We've consistently identified winners across multiple cycles. Bitcoin under $1,000, Ethereum under $70, Solana under $10, WIF from $0.003 to $5, PopCat from $0.004 to $2, SPX blasting past $1.70, and our latest pick has already 200X'd since June 2025. Everything is timestamped and public record.
Do I need to be an experienced trader or investor to benefit?
No. When we founded Cryptonary in 2017 the market was new to everyone. We intentionally created content that was easy to understand and actionable. That foundational principle is the crux of Cryptonary. Taking complex ideas and opportunities and presenting them in a way a 10 year old could understand.
What makes Cryptonary different from free crypto content on YouTube or Twitter?
Signal vs noise. We filter out 99.9% of garbage projects, provide data backed analysis, and have a proven track record of finding winners. Not to mention since Cryptonary's inception in 2017 we have never taken investment, sponsorship or partnership. Compare this to pretty much everyone else, no track record, and a long list of partnerships that cloud judgements.
Why is there no trial or refund policy?
We share highly sensitive, time-critical research. Once it's out, it can't be "returned." That's why membership is annual only. Crypto success takes time and commitment. If someone is not willing to invest 12 months into their future, there is no place for them at Cryptonary.
Do I get direct access to the Cryptonary team?
Yes. You will have 24/7 to the team that bought you BTC at $1,000, ETH at $70, and SOL at $10. Through our community chats, live Q&As, and member only channels, you can ask questions and interact directly with the team. Our team has over 50 years of combined experience which you can tap into every single day.
How often is content updated?
Daily. We provide real-time updates, weekly reports, emergency alerts, and live Q&As when the markets move fast. In crypto, the market moves fast, in Cryptonary, we move faster.
How does the 3X Value Guarantee work?
We stand behind the value of our research. If the documented upside from our published research during your 12-month membership does not exceed three times (3X) the annual subscription cost, you can request a full refund. Historical context: In every completed market cycle since 2017, cumulative documented upside has exceeded 10X this threshold.
TermsRecommended from Cryptonary